RLS or Row-Level Security as the name suggests is a security mechanism that restricts the records from a SQL Server table based on the authorization context of the current user that is logged in. This means the records from the tables are displayed based on who the user is and to which records do the user has access to. This is usually done to allow specific users to have access to their data only without permission to view other users’ data.
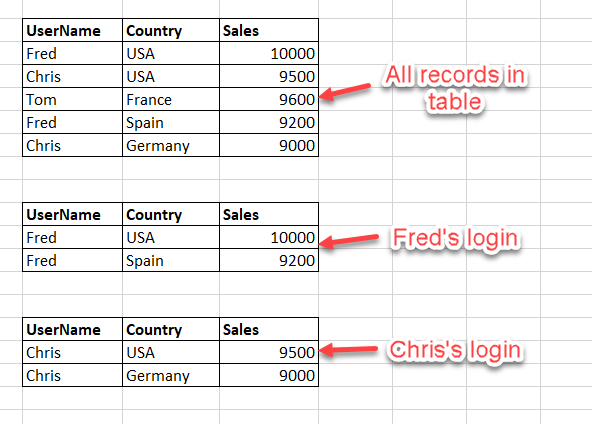
Figure 1 – Row-Level Security Illustration
As you can see in the illustration above, the first set of records depicts the entire table in the SQL Server database which has 5 records in it. A master user may be able to view all the records in the table. However, when a specific user logs in, the Row-Level Security in SQL Server feature blocks the view of data based on the column “UserName”. For example, when the user “Fred” logs in he can see only 2 records that belong to him. Similarly, when “Chris” logs in, he can only view data that is relevant to him.
Row-Level Security in SQL Server is used to restrict the users at the database level rather than handling the restrictions at the application level. This access control is applied by the database every time a query is executed on the table irrespective of any application tier. This allows a more advanced security system that can handle the restrictions by itself without relying on any external conditions. An added advantage of having the access control on database tier as opposed to the application tier is that now users can directly have access to the SQL Server table and can query their own data.
Row-Level Security in SQL Server is available in multiple versions of SQL Server, starting from SQL Server 2016 onwards. It is also available in the Azure SQL Database and Azure SQL Data Warehouse.
Implementing Row-Level Security in SQL Server
In order to implement the Row-Level Security, we must apply the following steps one by one.
- Create specified users who want to have access to the data. These users will be granted access to some of the records based on their login context
- The next step is to create an inline table-valued function in SQL. This function will contain the filter predicate for the table on which RLS is to be implemented
- The final step is to create a security policy for the table and provide the above inline table-valued function to it
An important point to note here is that the security policies and the table-valued functions are unique for each table on which RLS is implemented. So, in order to create multiple tables with RLS, we need to create functions and security policies for each of the tables separately.
Now that we have some idea how to implement Row-Level Security in SQL Server, let’s go ahead and try to create one. For the sake of this article, I’ll try to keep things simple and replicate the illustration as provided earlier. We will create three users – one for each “Fred” and “Chris” and one for their CEO. The CEO will be the master user here and should have access to all the records in the table irrespective of the users.
Let us now create the table by executing the following script that we will be using in our article moving forward.
1 2 3 4 5 6 7 8 9 10 11 | CREATE TABLE Sales( UserName VARCHAR(50), Country VARCHAR(50), Sales INT ) INSERT INTO Sales VALUES ('Fred','USA',10000) INSERT INTO Sales VALUES ('Chris','USA',9500) INSERT INTO Sales VALUES ('Tom','France',9600) INSERT INTO Sales VALUES ('Fred','Spain',9200) INSERT INTO Sales VALUES ('Chris','Germany',9000) |
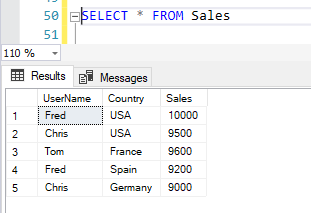
Figure 2 – Selecting Data
Step 1: Create the specified users
Let us now create the three users as discussed earlier. You can execute the following script to create the users as mentioned. Also, once the users are created, we need to grant select rights to all the users explicitly. Otherwise, the users won’t be able to query any data from the table.
1 2 3 4 5 6 7 8 9 10 | CREATE USER CEO WITHOUT LOGIN; GO CREATE USER Fred WITHOUT LOGIN; GO CREATE USER Chris WITHOUT LOGIN; GO GRANT SELECT ON dbo.Sales TO CEO; GRANT SELECT ON dbo.Sales TO Fred; GRANT SELECT ON dbo.Sales TO Chris; |
Step 2: Create the inline table-valued function
Once the users are created the next step is to create the table-valued function. This function will check the user who has logged in and will return the result set based on the login context of the user only. Execute the script below to create the inline function.
1 2 3 4 5 6 7 8 9 | CREATE FUNCTION dbo.fn_SalesSecurity(@UserName AS sysname) RETURNS TABLE WITH SCHEMABINDING AS RETURN SELECT 1 AS fn_SalesSecurity_Result -- Logic for filter predicate WHERE @UserName = USER_NAME() OR USER_NAME() = 'CEO'; GO |
Step 3: Apply the Security Policy
Once both the above steps are done, the final step to implement Row-Level Security in SQL Server is to apply the specific security policy which will enforce the filter predicate and pass it to the underlying query just like a where clause filter.
1 2 3 4 5 | CREATE SECURITY POLICY UserFilter ADD FILTER PREDICATE dbo.fn_SalesSecurity(UserName) ON dbo.Sales WITH (STATE = ON); GO |
Test the RLS Implementation
Now that we have implemented the Row-Level Security in SQL Server, let’s go ahead and test the feature.
Let us first execute a simple select statement on the table.
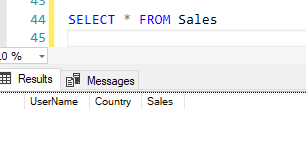
Figure 3 – Selecting Data
As you can see in the figure above, although we have inserted five records in the table, none of those are visible now. This is because the user I’ve logged in to SQL Server is not defined in the filter predicate of the table-valued function.
Let’s now execute the same statement by running it under the context of the user “Fred”. In order to change the user context, you can run the following script.
1 2 3 4 | EXECUTE AS USER = 'Fred'; SELECT * FROM Sales; REVERT; GO |
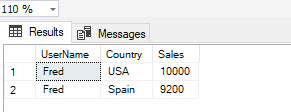
Figure 4 – Executing As Fred
As you can see in the image above, the records returned are only for the user “Fred” only. All other records from the table are not visible since they don’t belong to this user context.
Similarly, if we execute the same for the user – “Chris”, we can see all the records that belong to this user.
1 2 3 4 | EXECUTE AS USER = 'Chris'; SELECT * FROM Sales; REVERT; GO |
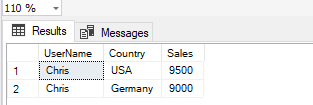
Figure 5 – Executing As Chris
However, if we execute the same code but for the CEO and not for any of the specific users, it returns all the records.
1 2 3 4 | EXECUTE AS USER = 'CEO'; SELECT * FROM Sales; REVERT; GO |
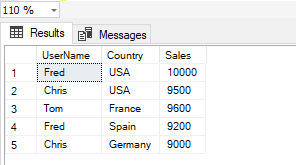
Figure 6 – Executing As CEO
This is because this user has access to all the records as defined in the filter predicate.
Let us also understand what is happening under the hoods by taking a look at the query execution plan for this table. In order to generate the Actual Execution Plan, right-click on the query window and select “Include Actual Execution Plan” and then execute the query. The execution plan will be generating which you can view as follows. You might also need to grant access to the users in order to view the execution plan. By default, the new users won’t have access to see the actual execution plans. You can grant access to view the execution plans by running the following script.
1 | GRANT SHOWPLAN TO CEO |
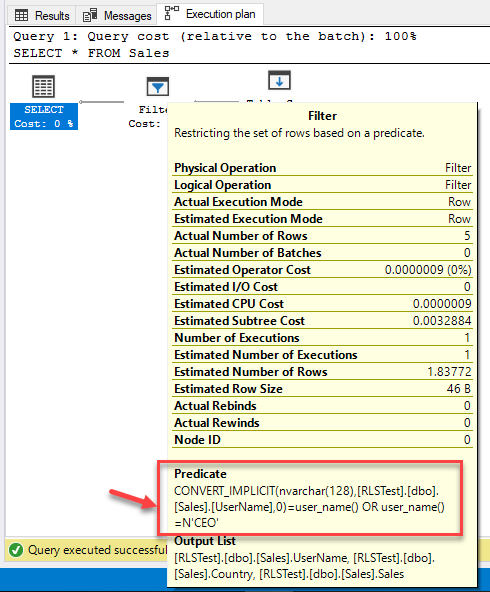
Figure 7 – Execution Plan
As you can see in the image above, the filter predicate that we have defined in the previous steps is being used in the query. The current username is passed as the filter to the column – “UserName”. This ensures that only the specified user will be allowed to view their respective records and all other records will be excluded from the result set.
Comments
Post a Comment